It’s beginning to look a lot like Christmas – ALL over my house! Saturday, I was child-free for 6 hours!!! So, I pulled out my Christmas “To Do List” and got busy. By the time the kids got home, cookies were in the oven, my peanut butter balls were almost finished, my house was spic-n-span, and I was finishing up my Christmas garland. I was on track to be festive and jolly for our Sweet Treats Swap Party, later that night.
I’ll post some pictures at the end of my blog, but we had a blast!
Today, I am going to tell how to make some of the things we had at our party. Can’t wait to see and hear about your swapping parties, as well!
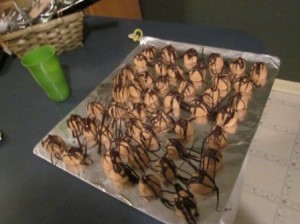
I started my preparation with the Peanut Butter Balls. These are easy to make, but require a little more time.

~Makes 150/170~
Food Stuffs:
Large jar of creamy peanut butter
3 sticks of salted butter-melted
1 1/2 cups Graham Cracker crumbs
6-7 cups powdered sugar
1/4 cup Honey
2 TBS sea salt
1 TBS Vanilla extract
1 Bag Dark or Milk chocolate chips
2 TBS oil
In your mixer, combine peanut butter, honey, salt, vanilla and graham cracker crumbs. Mix on low using the dough hook. Once everything is well blended, slowly add your powdered sugar. Continue adding sugar until the dough is firm like play dough, but not dry. If your dough gets too dry, it will crumble and not roll. If this happens, just add more melted butter. Mix for about 5min.
Turn your dough out onto the counter top and knead for 1min. Line a cookie sheet with foil and spray foil with cooking spray.
Mold your dough into 1in round balls and place on the cookie sheets about 1/2in apart. Once you have filled your pan, put it in the freezer for one hour.
Using a double boiler – I use my large pot and my large glass bowl, filling the pot with about an inch and a half of water and sitting the bowl on top – melt the chocolate chips. Once they are melted, add the oil. Remove the balls from the freezer. Bring your double boiler to the counter. Now, you can do this one of two ways: You ca
n dip the whole ball in the chocolate OR you can use a spatula and drizzle chocolate on top. I, personally, do NOT have the patience to dip each ball. I’ve tried it twice and drove myself crazy, each time!
Whichever way you choose, once you have all your balls finished, make sure you keep them in the freezer or fridge until you are ready to serve. I usually layer mine in a container – separate the layers with plastic wrap – and pop them back in the freezer.
Cake Mix Cookies: Dark Chocolate with English Toffee and Devil’s Food with chocolate chips
~Makes 20~

Food Stuffs:
1 Box of Dark Chocolate cake mix
1 Box Devil’s Food cake mix
4 Eggs
1 Cup oil
1/2 Bag of English Toffee pieces
1 Bag chocolate chips
I used this recipe and it was uber easy!
http://allrecipes.com/Recipe/Chocolate-Fudge-Cookies/Detail.aspx
For the English Toffee, I used the above recipe with the dark chocolate cake mix and just added half the bag of toffee. I tried it once with the whole bag, but it was TOO sweet.
Soda Can Santa and Sock Garland:
Stuffs:
7 soda cans
8 Squares of red felt
14 Assorted black buttons
7 Strips of black leather
6 Red and white striped socks
5 Feet of brown twine
Green bouquet wire
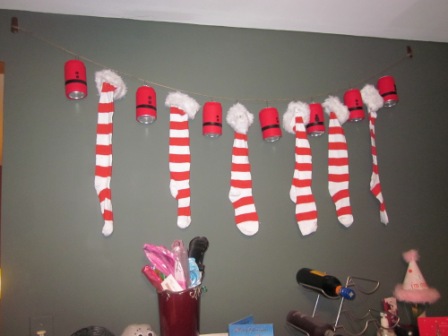
Ok, of all of the Christmas things we have in our house, this is my favorite! Here’s what I did:
I popped the tab on the can so that is stood upright and then I cleaned and dried the cans.
I had a 7in wide, 3 ft long panel of black leather that I had purchased from JoAnn’s Fabric for about 3 bucks. I cut 7 half inch wide/8 inch long strips. I cut my red felt in half, length wise. Next, I used hot glue and made a thin line of glue length wise down the can; then fixed one side of the felt to the glue and wrapped it tightly around the can and glued that half down, making sure that the seam was in the back of the can. I trimmed away the excess felt and glued my “belt” on approximately 2in from the bottom of the can. The buttons were glued on next. I made sure to orient my seams and buttons, so that the seams were directly opposite the buttons. This will make a crisp look when I hung the garland.
I found these super fun old school socks at the Dollar Tree and used them to alternate with the Santa cans. I cut 4 inch long pieces of wire and pushed one end through the back of the sock seam. Then I twisted the wire shut to form a ring. I did the same thing with the cans, only I used the top loop of the soda tab and twisted the ring to that. Tom, my husband, hung 2 Command hooks, that he painted to match our walls, and I tied one end of the twine to the hook using a slip knot. Next we strung the cans and socks – 1 can then 1 sock, alternating until they were all evenly spaced. I tied another slip knot and slung it over the other hook. Here is a picture of the finished product.


Discussion
No comments yet.